Network Security
Updated December 19, 2024
This article applies to:
- Terrain 3D
- Terrain Forestry
- RoadEng Civil
- RoadEng Forestry
- Softree Optimal
The Network License (enterprise licensing) runs as a server-side executable. It requires a physical computer, virtual machine or server.
Network Pre-requisites:
- Dedicated computer or server for use that all end-user machines can access
- Network computer or server must be connected (online) at all times
- Network Server needs to allow PING requests
- As of Version 11, the server also requires .Net 4.8
Installation Instructions:
There are 4 steps to setting up a networked version:
- Install the Network Executable – Do this on the machine (or virtual machine designated as your server)
- Load the product key(s) into the Network Executable
- Configuring the fire-wall settings
- Connect the end-user software / PC's to the Network Security option
Step 1 Install the Network Executable
Install the network executable software on the server or computer designated as the server. This installs as a tray executable with a background service process. Once installed, you can locate it in the desktop tray.
Download Link for Version 11 Network Executable
Step 2 Load the Product Key / Configure the Options
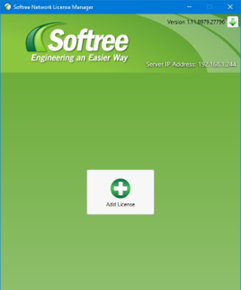
- Once installed, the network executable should automatically launch. If you cannot locate it open your desktop tray (or press the shortcut link on your desktop):

- Press the + button to enter your first product code, as shown in the figure below:
- The license manager dialog will be displayed, enter the network license code
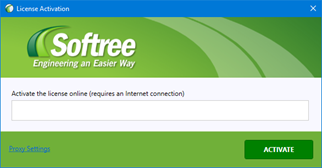
- Press "ACTIVATE".
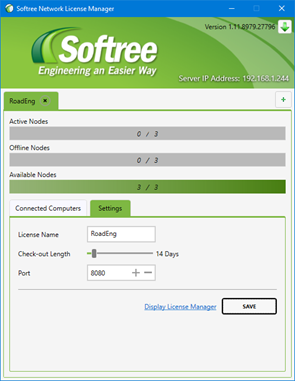
Back in the license manager main area, you can now configure your network license options:
- Set a License Name
- Set a Port Code - the default is 8080, but you can configure this manually if that port is already in use by another software or device.
- Configure Check out length - adjust the slider to limit the length of time one of the users can take the software offline (1-30 days).
- Press "SAVE".
If your network is hosting two product types (of the same version), press the + button to enter your 2nd product code. (If applicable).
- The license manager dialog will be displayed, enter the 2nd network license code.
- Press "ACTIVATE".
- Continue with the steps above to Set a License Name, port and check-out length for the 2nd License
Step 3 Configure your Firewall (Optional).
If you have a firewall, you need to either open the port you choose or add Softree License Server to the list of exceptions.
NOTE: If you are using a 3rd party firewall, refer to the firewall provider’s instructions for enabling software to operate through the firewall.
Window's Firewall Instructions:
- To create a firewall rule based on the software:
- On the Start menu, click Run, type WF.msc, and then click OK.
- Select Inbound Rules, then Click New Rule...
- Ensure "Program" is selected and click Next.
- Ensure "This program path:" is selected and then click Browse. Navigate to the folder you installed Softree License Manager to (default folder is: C:\Program Files (x86)\Softree\License Manager Server). Select SoftreeNetworkService.exe and then click Next.
- Ensure Allow the connection is selected and then click Next.
- Select the Profiles you want the License Manager to be accessible from and then Click Next.
- Enter a Name and Description(optional) and then click Finish.
- To create a Firewall rule based on only the port:
- Repeat steps 1 - 2 above.
- Select TCP and then under Specific local ports: enter the port you entered above (default is 8080).
- Repeat steps 5-7 above.
Additionally, Echo Requests (ping) must be enabled to check internet connectivity. They are often blocked by default on Windows Server.

NOTE: For organizations with enhanced server security, please whitelist
licensing.softree.com, port 80 and 443.
Step 4 Connect the end-user software / PC's to the Network Security option.
Note: Softree's trial version software is not a full version. If your end-user has had a trial version of RoadEng Version 11 please un-install the trial, then install software from the link provided on licensing PDF (or request an installer link here).
- Install your Softree products on each of the end-user computers from software link provided with activation code on PDF or email (or request an installer link here)
- Once installed, run any module of the software. The License Manager dialogue will automatically be displayed:

- Select "NETWORK SITE LICENSE"
NOTE: the end-user computer must be online and able to connect to the server computer at time of configuration.
To add a server license:
In smaller network situations, the "Scan" function works really well. In larger network situations - we recommend manually configuring the license, by pressing "ADD".
- Scanning for a Network License:
- Press "Scan"
- the software will start scanning the network for available licenses.
- Once a license(s) are located, the details will be displayed in the scan.
- Press CANCEL to stop scanning and view the found licenses.
- Manually Configuring a Network License:
- Press "ADD"
- Enter the server name or IP address. (Note: the IP address is displayed in the top right corner of the license manager)
- Enter the port # as configured in the license manager.
- Press "VERIFY and ADD"

NOTE: If the server has a fluctuating IP address, we recommend adding by Name vs IP.
- Select the desired available license:
- Select the desired Available License (if more than one) and press Connect.

- The license activation summary screen will be shown. Press Continue to close license manager and utilize the software.
